Hello, my name is Dennis Haupt, I’ve been a Blender user for over eight years.
Currently I am working as an animator, 3d graphic and Interface designer at InGAsys
in Germany we are using the Blender Game Engine in combination with our
software (InGAsys/ Intelligent Gait Analysis System) to visualize painful
areas in the human body during walking based on measurement data.
I was asked to share some of my animation knowledge in a tutorial on Sketchfab.
I was often asked how I made the rig for the animation of my futuristic combat jet,
so I chose this as topic for it.

First up I want to describe how I made the rig, the Action constraints for an easier
animation and the Track To constraints for the hydraulic components of the plane.
Later I will go into animating the whole airplane like you can see it in the animation on
Sketchfab:https://sketchfab.com/models/15ec020a8079446b8ff5cebb82935660/embed
And finally I will show you how to convert all the bone constraints into one action.
This is important for the export as FBX because Blenderwill not export the action
constraints Setup to the FBX format.
So enough with the intro, let’s start this!
The Rig
My rig contains two types of bones, bones with constraints for moving the parts
of the airplane and bones for controlling the movement by using one action for all parts.

The Action Constraint
For explaining how I have adjusted the Action and the Track To constraints
I choose the front landing gear, the other animated parts of the plane are
made the same way.

By scaling the control bone for the front landing gear from 1.000 Y to 2.000 Y the front
landing gear will move into the plane.

The control bone drives a predefined Action (Aircraft_Action), all animations of the
plane are saved in this Action.
So how to set it up so that the landing gear control bone will drive the predefined
action for only one bone?

1 – Select the bone for the Action Constraint
2 – Go into the Bone Constraints section
3 – Click on Add Bone Constraint
4 – Select Action
5 – Setup the Action Constraint
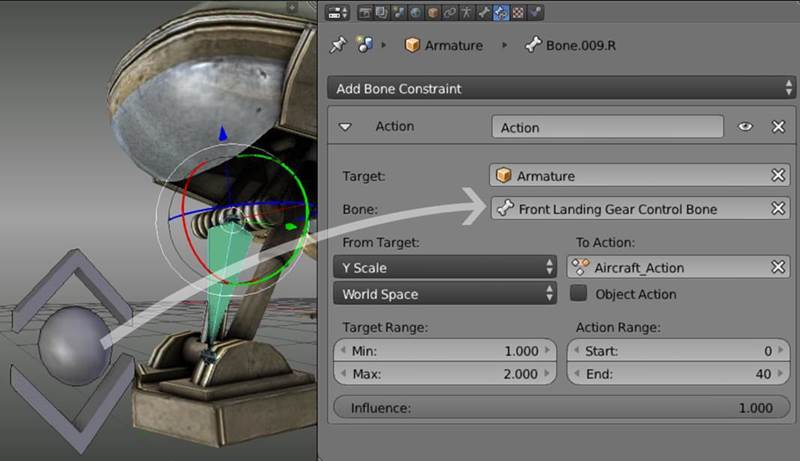
The Bone Constraint window has the following settings:
Target: The target is the armature object but it can also be a mesh object or an
empty object.
Bone: Enter the name of the bone or the object you want to use for
controlling the constraint. In my case it’s the front landing gear control bone.
From Target: Defines how to interact with the constraint. I used a Y scaling.
You can also use rotation or location for it.
To Action: Here you need to enter the name of the action you want to use
for the constraint.
Action Range: Here you need to enter the start and end frame of your Action.
For me, Start: 0 and End: 40.
Target Range: Here you can define the interaction range of the control bone.
I used Min: 1.000 Y and Max: 2.000 Y for scale. So when I scale up the control
bone the action will be played depending on the scaling.
Influence: Defines the Influence of the constraint 1.000 = 100%.
Copy Constraints to Selected Objects
This is the way how to set up a bone constraint for one bone, but what is if
you had to set up more bones with the same constraint, doingthis for every
bone in your armature would be very time consuming, but there is a nice
time saving way to copy one constraint to other bones.
To copy a constraint to other bones you need to select all bones with no
constraints first and at last the bone with the constraint you want to copy to.

Now click on Copy Constraints to Selected Bones under Pose/Constraints.
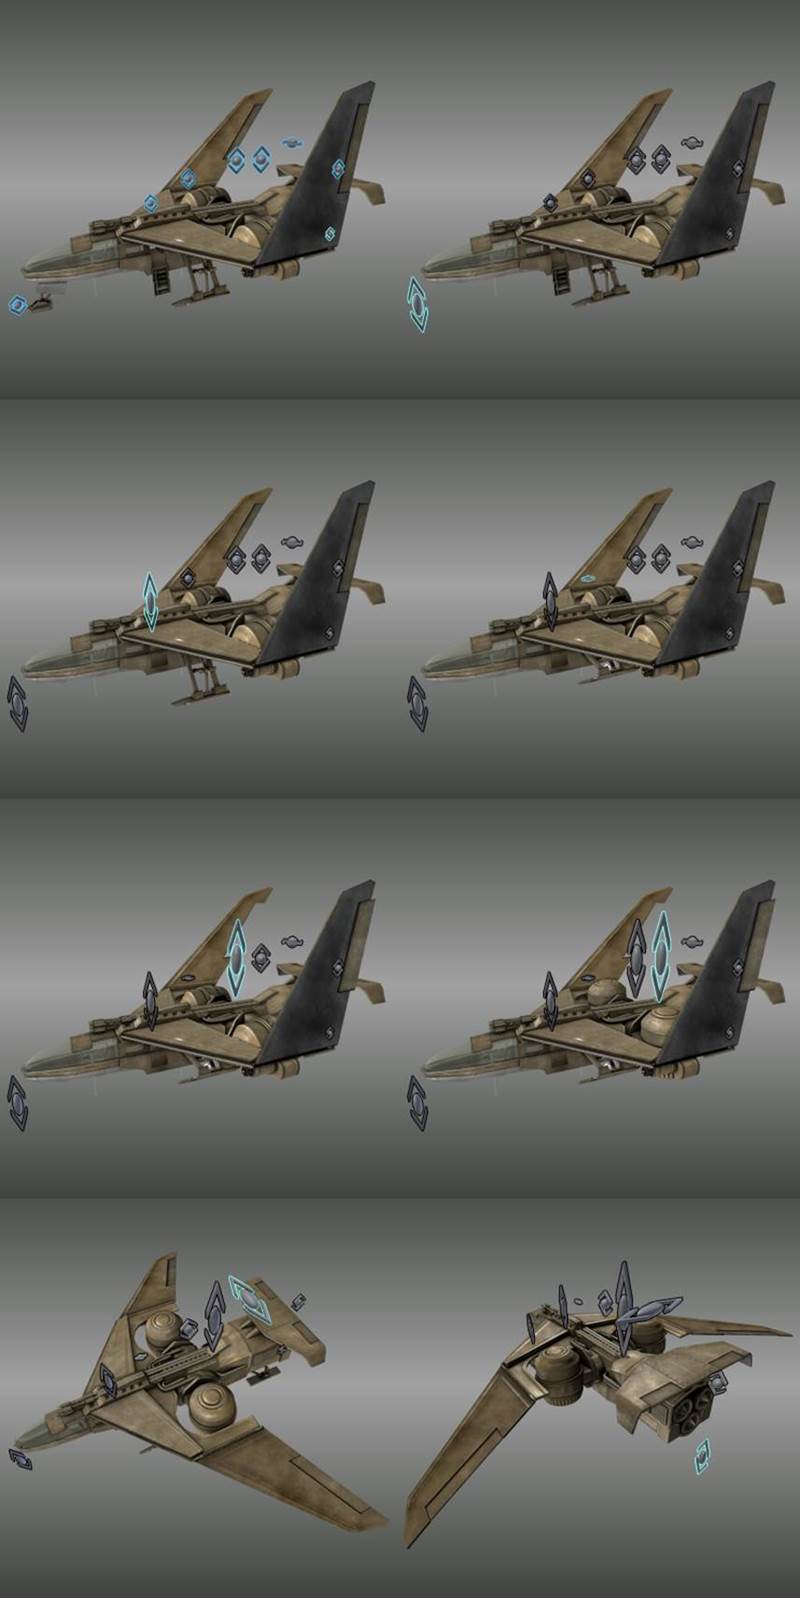
The Track To Constraint

Now let’s take a look at the Track To Constraints which I used for some hydraulic
elements in the front, the sides and the heck of the plane.
For a better overview I have activated B-Bone and Names into the Object
Data section for the Armature.

In this image:
– TargetBone2 is parented to TrackToTargetBone1.
– TargetBone1 is parented to LandingFoodBone.

In this Image you see how I have setup the two Track To Constraints
for TrackToTragetBone1 and TrackToTargetBone2.In my case the
Track To Constraints works along the y-axis.

It depends on how you made the armature which axis you need to use. Activate Normal
under Transform Orientationto see the axes of the bone you want to use for the
Track To Constraint.
So this is all I can say about how I have setup the constraints for this aircraft.
Let’s take another look at the Armature beforeI go into animate the whole thing.

I use 49 bones for this plane, to move the plane I had to parent all bone to a root bone.
So first I selected all the bones which will be the child objects and at last I select
the parent object (Root Bone) then I press [crlt] + [p] and select Keep Offset to
parent all bones to the root bone.
The Looping Flight Animation

For the looping flight animation I used another bone to move the plane in a circle.
I parented the root bone to the new bone which rotateson the x-axis during the animation
.
Making the plane ready for takeoff by using the control bones.
Preparing the animation for the FBX export
At the moment of writing, Sketchfab only supports FBX as 3d format for the animation
upload but other formats like blend, the Blender format, will follow in future I guess.

Before I hit the FBX export button I need to bake all bone constraints to key frames and
clear all the bone constraints from the Armature in one process. This can
be done under Pose/Animation/Bake Action…
First I define the Start and End Frame of my Action.
Then I set the Frame Step to 5, so just every fifth frame will be captured,
this keeps the file size small. It depends on your animation how may Frame Steps you
should use. In my case the animation is relatively slow so 5 for the Frame Step do no
visual damage to it, but if you have a quicker animation like a run cycle for a charter
you should use a low number like 2 or 3 for the Frame Step otherwise you will lose some
key frames which midge be important for the run cycle because a larger Frame Step will
make the animation more interpolated. If you bake your animation for each frame with
Frame Step 1 your file can become very huge, the file size is depending on how many
individual moving objects or bones you are using and how long the playtime of your
animation will be, if you have just a short animation and the animation needs to be
very accurate Frame Step 1 should be okay, just keep an eye on your file size before
you go and upload it to sketchfab.
Only Selected, it will bake just the selected bones or objects, I have selected all bone
by pressing [a] into the 3d-View.
Also I enable Visual Keying and Clear Constraints.After I baked the action to
key frames I have deleted all the unnecessary control bones.
Now everything is ready for the FBX export.

Thanks for reading, I hope it was inspiring and informative :)

